December 18, 2024

Apple macOS and PCF Development

Second part about my journey with the new Mac Mini M4 (first post here) and surprise surprise is about PCF development!

I usually don't code PCF components because most of the time I can find the one I need inside PCF Gallery, there are more than 550 components listed there, so big kudos to all the authors.

PCF development usually brings people not familiar with Power Apps/Power Platform inside the ecosystem, when a new control is published inside PCF Gallery I don't ask where they developed it but I suppose someone used a Mac.

First piece is to install Visual Studio Code, it's cross platform, perfect.

To develop PCF controls we need two important components:

  • NPM
  • Microsoft Power Platform CLI (also knows as PAC CLI)
To install NPM there are several ways, I installed first Homebrew (remember to add to the path by using the commands listed after the installation) and after I launched the command brew install npm.

To install the Microsoft Power Platform CLI you can install this Visual Studio Code extension:
BUT before installing this extension you need to have the .NET SDK on your machine, otherwise you get an error.
The latest versions of .NET are cross platform, I installed the SDK Installer, macOS Arm64 version from the official site:

After the SDK, proceed to install the Power Platform Tools extension and we can verify the PAC CLI is installed by running inside the Visual Studio Code Terminal the command pac:
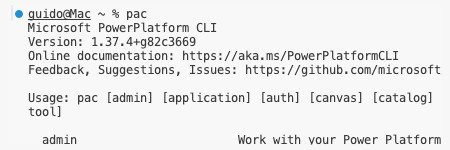

With NPM and PAC CLI we can now create a new PCF, just follow the Microsoft documentation for the right syntax:

Once you have the structure inside your Visual Studio Code you edit and test the PCF as usual, in my case I recreated my PCF Custom Url Control.

There is also a Microsoft documentation page on how to create a solution and package the PCF inside it:

Note: the path written inside the documentation is Windows style (c:\), as we are on Mac we need to use a different style, example:

pac solution add-reference --path /Users/username/folder

and because we have the .NET SDK installed we can use the command

dotnet build

this will create an unmanaged solution inside a debug folder, if you want a managed solution you can run the command

dotnet build -c release

Once you have the solution you can install it inside your environment and configure the PCF. A screenshot of my component inside a form:


I had no doubts I can create PCF controls with a Mac but to prepare the machine I needed some steps, however I had no problems by following the instructions I found from web searches and the Microsoft documentation.

What I will write inside the next episode? I don't know yet!

December 17, 2024

Apple macOS and Power Platform - Introduction

After watching numerous YouTube videos about the new Mac Mini M4 I decided to buy it, here a photo beside my mouse:
It's not my first Apple computer, I have a MacBook Air 2012 that I still use these days for browsing and of course I am a bit locked inside the ecosystem with my iPhone.

The majority (if not all) of the videos and articles about the new Mac Mini M4 is about editing videos, games and general productivity. All the reviews are ok but I wanted to know how this machine performs for MY work, considering I spend several hours with Visual Studio 2022.

I bought the basic model (16 GB of RAM and 256 GB of storage) for two reasons:
  • It's the entry level (so the cheapest model)
  • RAM is not expandable, so I want to know if they are enough or not (because RAM on these machines is expensive)
First of all: all the activities where only a browser is required works perfectly (basic tasks like modifying a table or adding a column) but I am sure everybody knows this.

Which is the first tool I need for my Power Platform activities? Of course XrmToolBox!

Let's go technical, this new Mac Mini M4 is an ARM machine and the current virtualization technology only allows (with decent performance) to run Windows 11 Arm edition, let's try it.

There are several virtualization software: Parallels, VMware and VirtualBox.
I like and use VirtualBox on Windows but I am not convinced of its performances about Windows 11 Arm.
I use Parallels but it's a paid product, I already spent money to buy the machine, let's skip it for now.
VMware offers a free version of VMware Fusion Pro, so I decided to use it.
You can follow this YouTube video: https://www.youtube.com/watch?v=LWXO4DhQRL0
Note: the download page is a bit different now, you need to download the latest version of the software and when you run the setup you get prompted to obtain the free version (some of the comments in the video are about this step).
The video also provides the step to install Windows 11, so it was perfect for me.

After I completed the installation, the question is: will XrmToolBox works?
And the answer is YES!

I quickly downloaded some tools (the one I used the most), in particular:
  • FetchXML Builder by Jonas Rapp (the most downloaded tool)
  • Plugin Registration Tool (a must for the work I do)
  • Custom API Manager by David Rivard (I am an avid user of this tool)
  • Ribbon Workbench by Scott Durow (still required sometimes)
  • Dataverse REST Builder by me
I don't know if they work 100% of the cases but I didn't experience crashes and also Ribbon Workbench that is still using the old Internet Explorer engine works under Windows 11 Arm.
My tool uses the WebView2 component (based on Edge) so I also wanted to know if it works as well.

The virtual machine to run Windows 11 Arm is configured with only 4 GB of RAM (Windows and XrmToolBox works fine), the used RAM in the moment I am writing is around 12 GB but I have several apps opened (including Teams for Mac occupying 800 MB and Google Chrome taking 1 GB), with only the Virtual Machine opened you use 8/9 GB total of RAM. In my opinion 16 GB of RAM to use XrmToolBox inside a Virtual Machine are enough, my goal is not to use the Virtual Machine for everything (I don't plan to install Visual Studio 2022 inside it) but only for the apps I cannot use directly on macOS.

I will be able to use this new Mac for everything? Let's see in the next episodes!

November 17, 2024

a Canvas app for bus tickets? Possible!

A month ago I attended Scottish Summit 2024 in Aberdeen, because was a new place for me I decided to visit the city and I used the public transportation.
I downloaded the "Stagecoach" app and I bought a ticket, it appeared like this screenshot:
When I launched the app I was surprised, in addition to the QR Code in the top there is also a centered colored bar, switching between the time and a random word.
The colored bar also tilts based on the accelerometer of the mobile phone.

Why they implemented this colored bar? The reason (in my opinion) is to facilitate the driver to check the ticket validity without scanning the QR Code.
  • Color and word change every day, today can be green with the word "house", tomorrow can be red with the word "crisp", probably at the beginning of the shift the driver knows the color and the word of the day.
  • The switch between the time and the word and the tilt is to show you are inside an app and is not a screenshot
After I used the app I asked myself: "Can I build a Canvas App with similar concepts?"
I usually don't do Canvas apps but this was interesting to me for two reasons:
  1. it's not the usual gallery/edit data app
  2. I am implementing a real business scenario
Let's start with the QR Code, there are some PCF controls but I wanted to keep it as simple as possible, so I used a service from this site: https://goqr.me/api/
It returns a QR Code as image with the text I want, for example this one shows my LinkedIn profile:

The challenging part is of course the colored bar.
First of all I needed to display the current time, so I added a Timer (with AutoStart equals true and Duration 1000 - 1 second) where I wrote the following formula:

Set(CurrentTime, Now())

In this way I have a variable updating every second with the current time (Now function).

After I added a label to display the time, I just want to show hours and minutes, so the formula for the Text property is:

Text(CurrentTime, "HH:mm")

After I needed to switch between the time and the word, I decided to create a second label with some dummy text and I needed some logic to make visible the first label and hide the second (and vice versa) every X seconds.

Another timer then, this time running every 3 seconds and with AutoStart true. Power Fx has the Mod function, if I do a formula Current Seconds MOD 2, I get 0 or 1. Because the timer runs every 3 seconds, I am sure he seconds will be one time odd and one time even. Let's wrap everything in this formula: the variable is named CurrentMode, it fetches the seconds of the current time, converting it to a number (Value function)

Set(CurrentMode,Mod(Value(Text(Now(), "ss")),2))

Now I can use the variable CurrentMode for the Visible property of these two labels, one is set to CurrentMode and the other to !CurrentMode. In Power Fx 0 and 1 are equivalent to false and true statements.

Next step is the tilt, I didn't find a way to rotate a shape inside a canvas app so I decided to change the vertical position of the labels based on a device property. I used the Compass.Heading but there are others functions you can use.
The formula I applied for the Y property is the following:

350+(Compass.Heading)

So every time I move the mobile phone, the label position gets updated.

Now we need to take care of the color, for simplicity I assume each day has a different color, so the Fill property of the label is a Switch statement based on the Weekday of Today (Weekday returns a value from 1 to 7). Formula:

Switch(Weekday(Today()), 1, Color.LightBlue, 2, Color.Orange, 3, Color.LightGreen, 4, Color.Yellow, 5, Color.Violet, 6, Color.PaleVioletRed, 7, Color.LightGray)

Last part is to have a different word every day, we need 366 words, so I created a Named formula called Words, storing a Table with a property named Word:

Words = Table({Word:"apple"},{Word:"bread"},{Word:"crane"}, ...)

This is a bit tricky, inside a Canvas app we don't have a function as DayOfYear so I needed to use DateDiff function with a combination of Year and Today functions:

Index(Words,DateDiff("1/1/"& Text(Year(Today())),Today())+1).Word

The Year is used to get the first day of the year, DateDiff calculates the difference and we add 1 because Index to access the table starts from 1.

Now the app is ready, here a video in action (I left the timers and the value of the Mod variable visible):

September 12, 2024

new project: Hōjin Bangō Custom APIs (Japanese Corporate Number)

I was recently in Japan (not my first time there) and each time I try to learn a bit about the culture.
One of my recent encounters is the Corporate Number called in Japan hōjin bangō (法人番号), in a certain way the equivalent of a VAT Number to identify a company.

My next thought was: I am sure there is a service to check the validity of these corporate numbers.

There is indeed a web site by the National Tax Agency in English and Japanese and looks like there is also a web service to check the validity by using an API, more info (only in Japanese) here.

I am not proficient in Japanese but with the help of Google Translate looks like this endpoint is not public (like the EU one) but requires a registration and can take up to a month.

For me it's not possible to use this API endpoint but their website allows to search without registration a corporate number.

Next step was to search for some Japanese corporate numbers to verify them, quickly I found the number of two companies: Nintendo (1130001011420) and Sony (5010401067252) ;)

This is a website screenshot with a result, if the number is correct, the website returns the company name (also in Furigana) and the address:

My goal was to create a Custom API to verify a corporate number, because I am not able to use their API, I used the old WebClient to call the page and parse the returned content.

I am aware this is not a robust situation but we can apply this technique when an API is not available and the parsing of the page is not complex.

The Tax Agency website accepts a URL in the following format:

https://www.houjin-bangou.nta.go.jp/henkorireki-johoto.html?selHouzinNo=

followed by the corporate number

and if the number is found, the details are contained inside a dl tag (Description List).

The Custom API call the parameterized URL, parse the response and returns 4 properties:

  • Success (if the number is found or not)
  • CompanyName1
  • CompanyName2
  • Address
You can find the code and the managed solution inside the repository:

Here a screenshot of this Custom API inside a Power Automate flow using the "Perform an unbound action":


hope it helps!

July 12, 2024

Rich Text to Plain Text conversion inside Power Apps

Sometimes we need to get only the text from an HTML document, like the Rich Text format available for the text type inside Dataverse/Model-driven app.

If you need to perform this action client-side, a simple JavaScript function can be used:

function parseHTML(html) {
	let doc = new DOMParser().parseFromString(html, 'text/html');
	return doc.body.textContent || "";
}

function test_richtext_OnChange(executionContext) {
	var formContext = executionContext.getFormContext();
	let richTextValue = formContext.getAttribute("test_richtext").getValue();
	let cleanValue = parseHTML(richTextValue);
	formContext.getAttribute("test_plaintext").setValue(cleanValue);
}

It uses the DOMParser interface, here a screenshot on how the result looks like inside a model-driven app:


Hope it helps!

May 17, 2024

Power Fx and what I mean for low-code

Power Fx is one of the programming languages available inside Power Platform, the Microsoft documentation reports:

Power Fx is the low-code language that will be used across Microsoft Power Platform.

It's mostly used inside Canvas Apps but inside a canvas app it's very difficult for me to call it "low-code", if there is a function called "Explain This Formula" inside Copilot (link) it usually means it's hard to read or people tend to write complicated code that is not readable.

Being a developer probably for me it's easier to read some C# code than some Power Fx formula connected to items inside a canvas app where fields are referenced with the display name.

However there is another part where Power Fx is used inside Power Platform: the possibility to create new Formula columns inside Dataverse, in my opinion this is a very powerful tool at our disposal.

Years ago I created this PCF: Custom Url Control
The idea behind the PCF was simple, to create a clickable url with data coming from the record.

The same thing these days can be done with a Formula column writing a simple Power Fx formula.

Let's assume you have two columns inside a table: Code (text containing the tracking code) and Company (choice with the couriers, in my example USPS and UPS)

We want to create a URL column so when the Company is USPS the link is:
https://tools.usps.com/go/TrackConfirmAction?qtc_tLabels1=[Code]
and when the Company is UPS the link is:
https://www.ups.com/track?tracknum=[Code]

This column can be a Power Fx formula using a Switch statement:

Switch(Company, 'Company (Shipments)'.USPS, "https://tools.usps.com/go/TrackConfirmAction?qtc_tLabels1=" & Code, 'Company (Shipments)'.UPS, "https://www.ups.com/track?tracknum=" & Code )

In this case the first parameter of the Switch operator is the column we are checking: our Company column.
The following parameters needs to be considered by two: Match and Result.
Match in our case is the choice value (USPS) and the Result is the URL we want, the first part is fixed (the USPS website) and after is concatenated the Code.
You can also see the second couple (UPS choice and UPS website).

The result in a model-driven app form is the following:


The main advantage? The value of this column is available everywhere: inside a model-driven app, a canvas app, a Power BI report, a Power Automate flow, etc etc.

This is in my opinion a good example of low-code, you wrote something simple, understandable but very powerful, years ago for the same requirement you needed to create a PCF, before that probably a C# plugin, now just a short Power Fx formula.

April 20, 2024

My idea to give something to the community: the CCA License!

If you follow tech news you may have read something about "xz Utils" (you can find an article about it here).

I don't have a solution to this kind of problems and my support goes to Lasse Collin, the creator and my maintainer of xz Utils.

How an Open Source software is licensed plays an important role and made me think:

what can I add to the MIT License (the license I normally use) something to recognize the community around what I am releasing?

This is the idea behind the CCA License (link: https://github.com/GuidoPreite/CCA-License)

CCA stands for Community Contributor Awareness, practically is a MIT License with the addition of a donation clause.

With the next releases of some of my tools I will start to use the CCA license, with this donation clause:

XrmToolBox or any of the Open Source tools in its library, any time, no minimum amount required or you are a code contributor of an Open Source software related to XrmToolBox.

What does it means?

It means that in order to use my software and be complaint with its license, the end user must have donated to XrmToolBox or any of the Open Source tools in its library, I don't care if you donated in 2018 or in 2024 (for me the important is that you donated), I don't care how much you donated (we live in different parts of the world), also you can use my software if you created an Open Source tool for XrmToolBox.

The GitHub repository of the CCA License has some examples of donation clauses.

XrmToolBox is an important software for anyone working with the Power Platform and it's free. I use it everyday, what I am doing with this new license is to help with this project and the ecosystem around it.

I am well aware this license will not change the world but I hope it can help a little some projects that are essential to this community.